I’ve configured this with Docker-Compose but I’m sure there are probably easier ways to accomplish the same thing.
Installing Docker
First thing we need to install Docker on the NAS which is relatively straight forward, we go to Package Center, search for Docker and click Install.

Creating the required files
I created the two files from the MeshCentral docker github page here, my files are below
.env file
NODE_ENV=production
HOSTNAME=meshcentral.phm.pw
USE_MONGODB=false
# set to your reverse proxy IP if you want to put meshcentral behind a reverse proxy
REVERSE_PROXY=true
REVERSE_PROXY_TLS_PORT=443
IFRAME=false
ALLOW_NEW_ACCOUNTS=false
WEBRTC=true
ALLOWPLUGINS=false
LOCALSESSIONRECORDING=false
MINIFY=true
docker-compose.yml
version: "3"
services:

  meshcentral:
    restart: always
    container_name: meshcentral
    hostname: meshcentral
    # use the official meshcentral container
    image: ghcr.io/ylianst/meshcentral:latest
    ports:
      # MeshCentral will moan and try everything not to use port 80, but you can also use it if you so desire, just change the config.json according to your needs
      - 8086:443
    env_file:
      - .env
    volumes:
      # config.json and other important files live here. A must for data persistence
      - ./meshcentral/data:/opt/meshcentral/meshcentral-data
      # where file uploads for users live
      - ./meshcentral/user_files:/opt/meshcentral/meshcentral-files
      # location for the meshcentral-backups - this should be mounted to an external storage
      - ./meshcentral/backup:/opt/meshcentral/meshcentral-backups
      # location for site customization files
      - ./meshcentral/web:/opt/meshcentral/meshcentral-web
I then uploaded these two files to the docker folder on the NAS using the File Station app, I also created the folder structure for MeshCentral in the docker folder to match their instructions as so
| - meshcentral/        # this folder contains the persistent data
  | - data/             # MeshCentral data-files
  | - user_files/       # where file uploads for users live
  | - web/              # location for site customization files
  | - backup/           # location for the meshcentral-backups
| - .env                # environment file with initial variables
| - docker-compose.yml
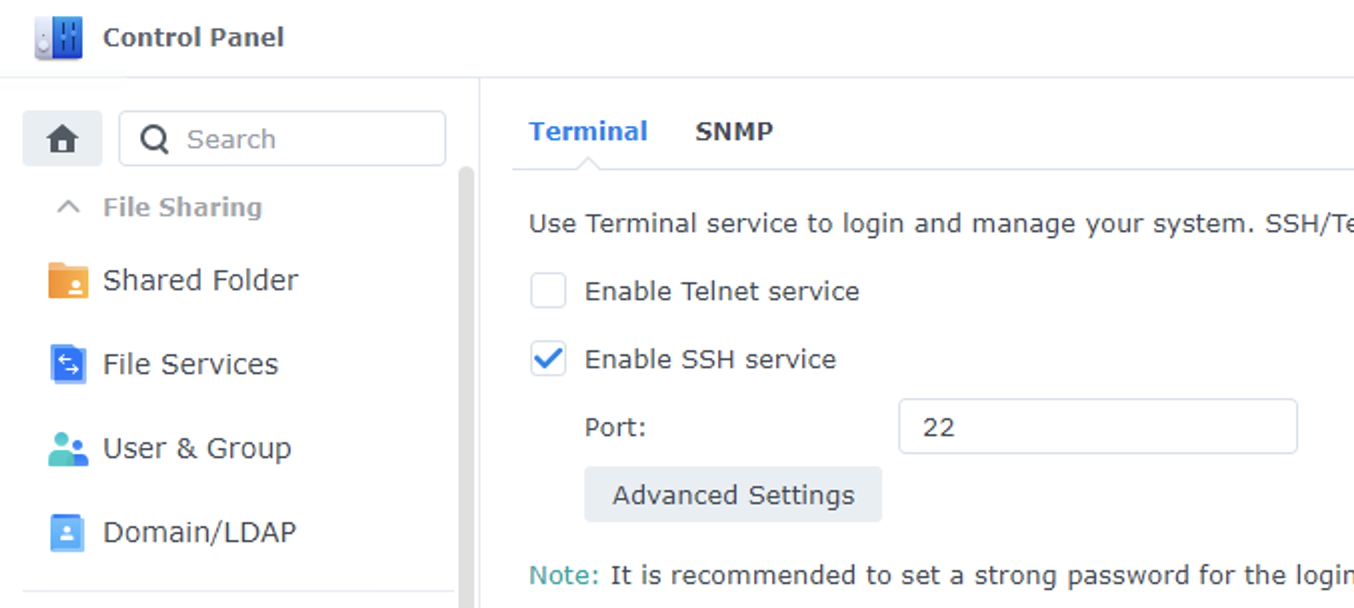
Enabling SSH access
To be able to run docker-compose we need SSH access to the NAS, this is enabled in Control Panel / Terminal and enable SSH.
Connecting with SSH and starting MeshCentral.
As I’m using Windows 10 i went to the command prompt and ran the following
ssh nasadmin@nasipaddress
cd volume1/docker/
sudo docker-compose up -d
sudo docker-compose logs meshcentral
Although docker-compose installed MeshCentral fine, I could see from the logs I was getting an error “meshcentral | ERROR: Unable to parse /opt/meshcentral/meshcentral-data/config.json.” I quickly looked at the config file in meshcentral/data/config.json and could see the sessionkey line had got messed up somehow. The easiest thing for me to do was just to edit the file to fix the error, the line appeared as
"sessionKey": "4aN%oGCwGQ]Q]B[qe[%`WkOwonou"_sessionKey": "MyReallySecretPassword1"U]",
Not really too sure what happened there, as I did this before and it worked first time, however, I changed the line as follows
"_sessionKey": "MyReallySecretPassword1",
The underscore at the start means it is not used, so will generate a random sessionkey each time it starts.
That was it, MeshCentral was now accessible from the NAS webpage by going to https://nasname:8086 but I still need to set up the reverse proxy on the NAS to allow connections on port 443 and with a proper SSL certificate. If you are happy to leave it on port 8086 you just need to change the line in the config.json file to say
"aliasPort": 8086,
So the agents you deploy will know the correct port to use.
Setting up Mesh Central for Reverse Proxy.
Firstly we need to stop meshcentral to edit the config file, from the NAS you can go to the docker application then click Containers, Actions and then Stop
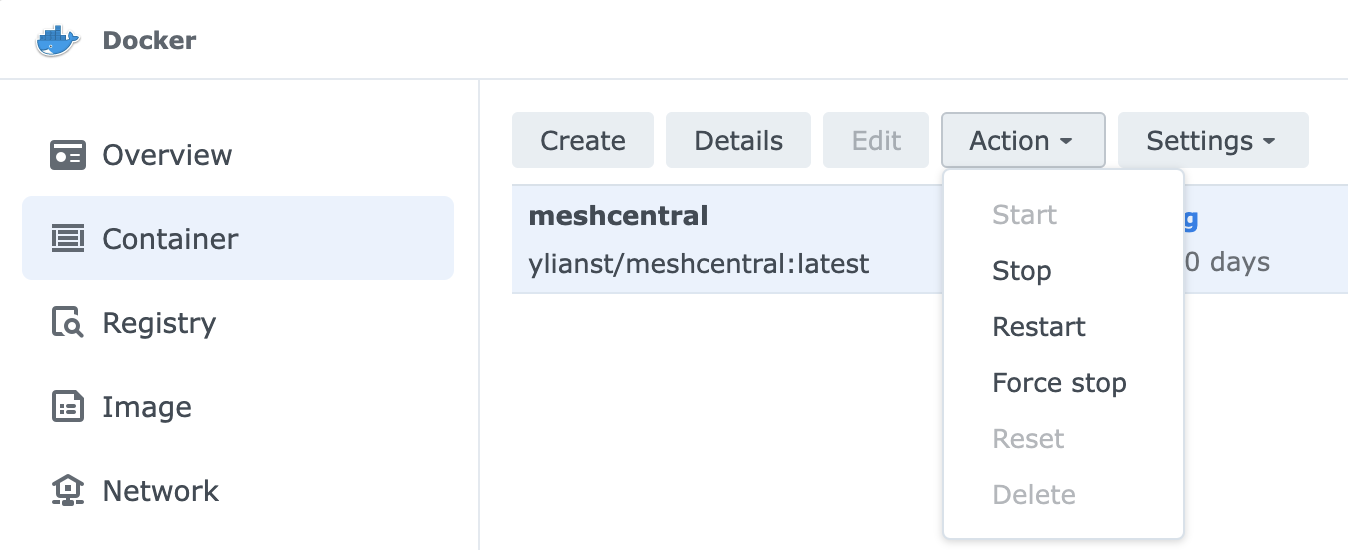
Or in an SSH session you can type “docker stop meshcentral”
Then you can either use File Station to download the config.json file from /docker/meshcentral/data to edit it locally and upload once changed or use SSH with “sudo vi /volume1/docker/meshcentral/data/config.json” –
The lines we want to change are
    "TLSOffload": true,
...

    "certUrl": "meshcentral.phm.pw"
So the entire config looks like
{
  "$schema": "https://raw.githubusercontent.com/Ylianst/MeshCentral/master/meshcentral-config-schema.json",
  "settings": {
    "plugins":{"enabled": false},
    "_mongoDb": null,
    "cert": "meshcentral.phm.pw",
    "_WANonly": true,
    "_LANonly": true,
    "_sessionKey": "MyReallySecretPassword1",
    "port": 443,
    "_aliasPort": 443,
    "_redirPort": 80,
    "_redirAliasPort": 80,
    "AgentPing": 60,
    "TLSOffload": true,
    "SelfUpdate": false,
    "AllowFraming": false,
    "WebRTC": true
  },
  "domains": {
    "": {
      "_title": "MyServer",
      "_title2": "Servername",
      "minify": true,
      "NewAccounts": false,
      "localSessionRecording": false,
      "_userNameIsEmail": true,
      "certUrl": "meshcentral.phm.pw"
    }
  },
  "_letsencrypt": {
    "__comment__": "Requires NodeJS 8.x or better, Go to https://letsdebug.net/ first before>",
    "_email": "[email protected]",
    "_names": "myserver.mydomain.com",
    "production": false
  }
}
Configuring the NAS for reverse proxy.
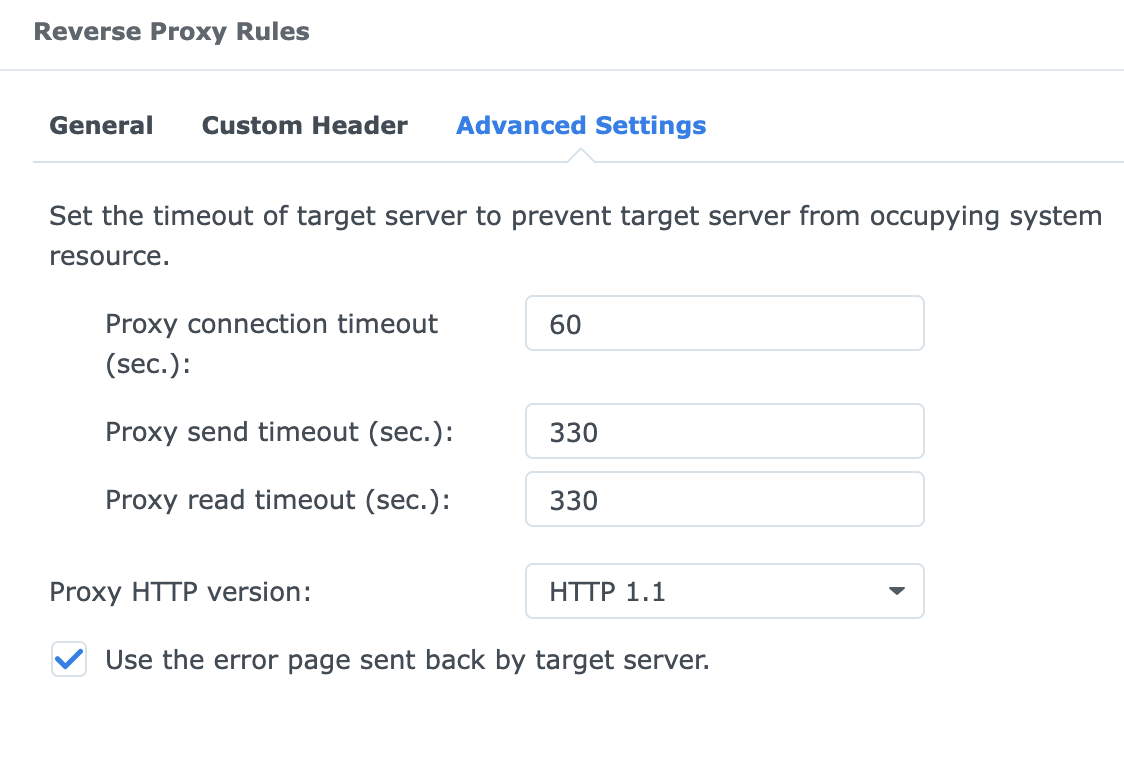
On the NAS admin page, we go to Control Panel / Login Portal / Advanced / Reverse Proxy and create, and configure as follows

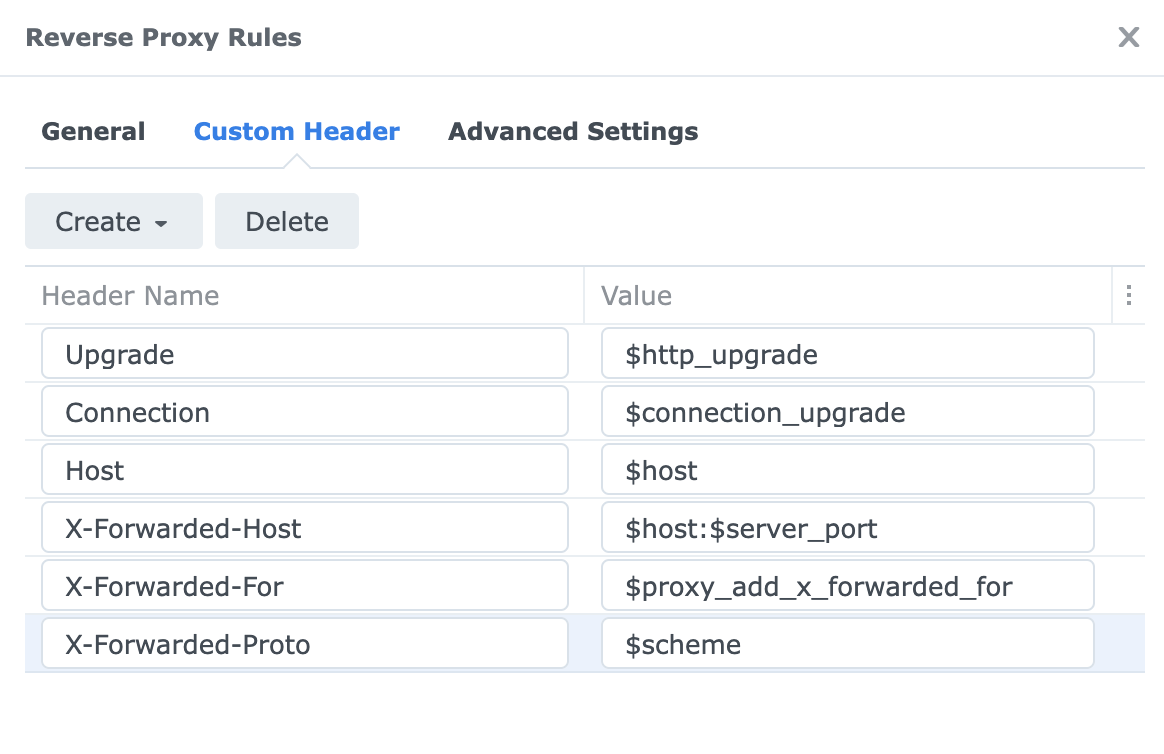
The first three are to allow websockets, and the last three to allow meshcentral to know the real IP address of the clients. MeshCentral suggests longer timeout which is done in the advanced tab.
Finally, we need to configure the certificate on the NAS, for me I have my domain name meshcentral.phm.pw pointing towards my NAS´s external IP Address and have forwarded port 80 and 443.
On the NAS we go to Control Panel / Certificates and Add, and enter the following


Assuming you have the DNS records and port forwarding is done correctly, this will get a certificate, next you need to click settings and make sure the reverse proxy connection is set to use the correct certificate.

That should be it, I can now connect to https://meshcentral.phm.pw which will redirect to my docker container and work.
Good luck! The last part of this blog was written very quicky so please comment below if you notice any errors or something is not working for you.
Way to go! I’ve myself gotten a bit further, actually setting up the reverse proxy in DSM and accessing Meshcentral through it. Unfortunately though, the forwarding of the original addresses by the proxy (X-Forwarded…) doesn’t seem to work. In the Meshcentral log I still get only the proxy’s IP address. Any luck with this part yet?
Sorry, too many things going on right now to finish the write up, but happy you got it working.
I have the following entries in my config for getting the correct IP address
proxy_set_header X-Forwarded-Host $host:$server_port;
proxy_set_header X-Forwarded-For $proxy_add_x_forwarded_for;
proxy_set_header X-Forwarded-Proto $scheme;
but this is running nginx as a reverse proxy on a linux machine, but I imagine it is very similar for the NAS.
Looks like you need to change the line
“TLSOffload”: false,
to
“TLSOffload”: true,
Once i did this MeshCentral started to show to correct IP address for the client.s
Hi, when i set “TLSOffLoad”: true, i get default page for synology web server, can’t login to MeshCentral…
TLSOffLoad: false, server started and connect my pc from one ip address
Hi,
With TLSOffload set to true, it means MeshCentral will be running without TLS, so if you tried connecting to https://nas_ip_address:8086 you should get an SSL protocol error, but if you try http://nas_ip_address:8086 it should work?
If that is the case, I would double check your reverse proxy destination is set to HTTP and not HTTPS.
It may also be advisable to configure the docker compose file to only listen on the localhost address, that way no one else on your network would be able to connect to the http://nas_ip_address:8086, they would only be able to connect using the correct hostname and with TLS (https://).
You would change the line in docker-compose.yml from
– 8086:443
to
– “127.0.0.1:8086:443”
I have not tried this, so good luck.
Many thanks for this guide. Helped me installed this on DS1512+ and it works fine.
Install worked fine on Synology with Container Manager.
The only thing i find is that clients for some reason are unable to connect. The install works fine, even through the temporary link. But nothing shows up in the console.
Running it on Synology DSM within Container Manager.
AD262CB981431433] ..\microstack\ILibParsers.c:10978 (0,0) Certificate loaded from DB was not signed by our root cert in the Cert Store
Is the error on the agent\client side
Agents install on the machines as active.
But don’t show in the web console to manage. I’m clueless where to look for.
When you start installing the agent, you can click details and it will show you the address and port of the meshcentral server. Does that look correct?